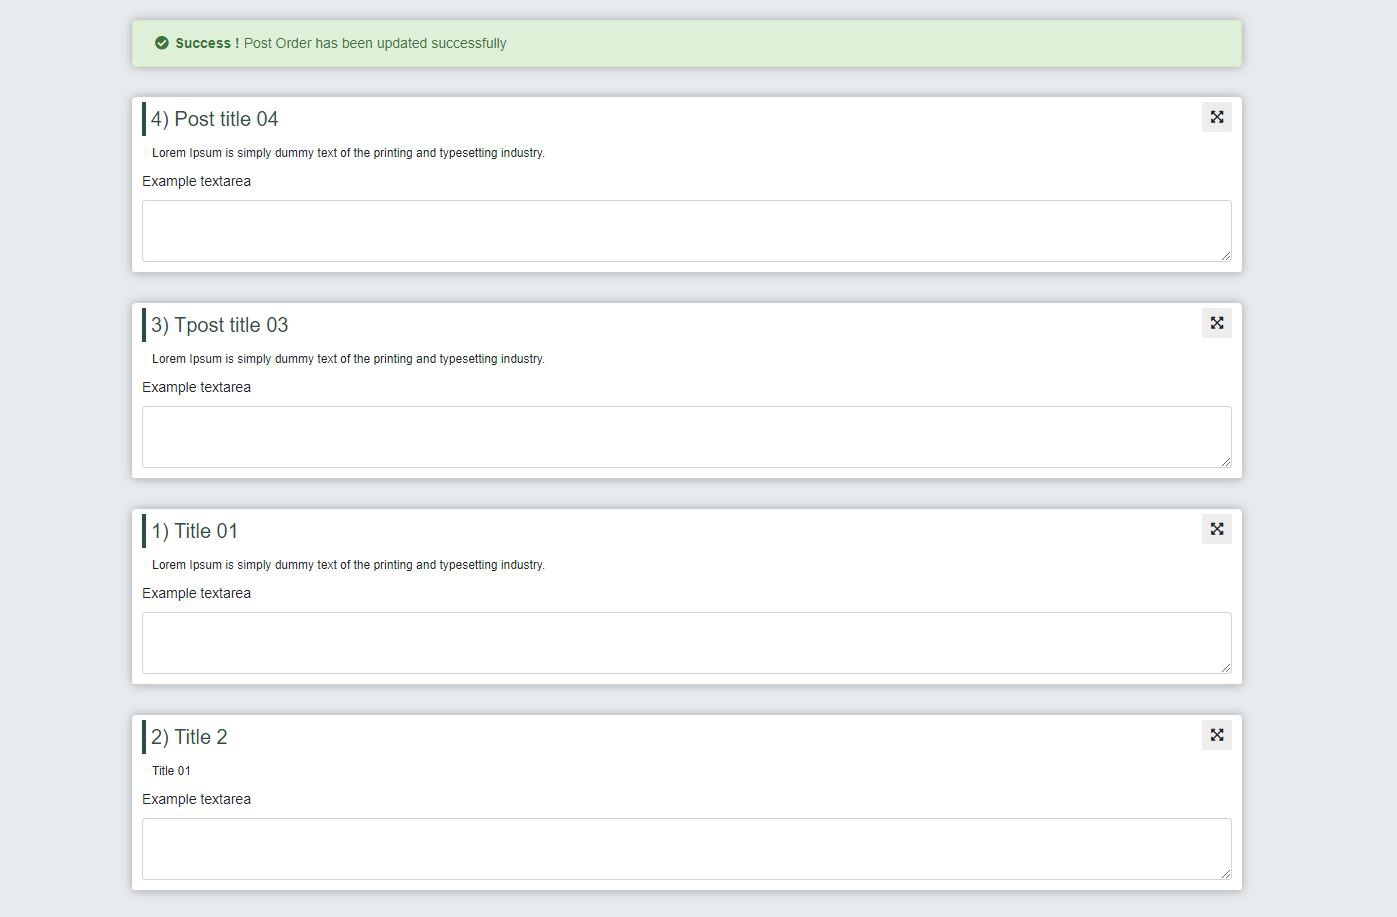
Table Row Sorting with drag and drop functionality using (Ajax, PHP, and MySQLi)
Hello, friends in this article we will discuss how to do Table Row Sorting with Drag and Drop functionality using Ajax and PHP script without refreshing the page. Using this function we can quickly sort or re-order table row data with an easy user interface and Drag and Drop HTML elements functionality. As we have JQuery UI Drag and Drop library and inside this library, there is a Sortable() function, and using this function we can easily move any HTML element from one area to another defined area and the particular element will be moved automatically and it will be placed.

We can follow the below step to do this :
step 1: create a table using SQL
step 2: create a connection file conn.php
step 3: create an HTML file index.php
step 4: write some custom CSS
step 5: write the ajax function
step 6: Create PHP functionon page
So, let's begin the above step as it is for a better understanding
step 1: create a table using SQL
First of all, we have to create a MySQL table and insert some data into it manually.
        --
-- Table structure for table `post_demo`
--

CREATE TABLE `post_demo` (
  `post_id` int(11) NOT NULL,
  `post_title` varchar(250) NOT NULL,
  `post_desc` text NOT NULL,
  `post_order_no` int(11) NOT NULL,
  `status` int(11) NOT NULL
) ENGINE=
step 2: create a connection file conn.php
After creating my SQL table and inserting some data into it we need to create a connection file so that we can connect to our database
and include it inside the index.php file
        <?php
$db_host = 'localhost';
$db_user = 'root';
$db_pass = '';
$db_name = 'shorting_tbl';

//connect and select db
$con = mysqli_connect($db_host, $db_user, $db_pass, $db_name);
?>
step 3: create a PHP file index.php
Now we are going to create an HTML file where we display our data by fetching it from the MySQL database, and bottom of this HTML page we call an ajax function so that this ajax function will automatically send requests to the PHP function page and it will receive updated data without refreshing the page.
After creating the index.php file paste below code inside the body section
        <?php
include('conn.php');
?>
<div class="container">
	<div class="row">
		<div class="col-12">

			<div class="alert icon-alert with-arrow alert-success form-alter" role="alert">
				<i class="fa fa-fw fa-check-circle"></i>
				<strong> Success ! </strong> <span class="success-message"> Post Order has been updated successfully </span>
			</div>
			<div class="alert icon-alert with-arrow alert-danger form-alter" role="alert">
				<i class="fa fa-fw fa-times-circle"></i>
				<strong> Note !</strong> <span class="warning-message"> Empty list can't be Process </span>
			</div>

			<ul class="list-unstyled" id="post_list">
				<?php
				//get rows query
				$query = mysqli_query($con, "SELECT * FROM li_ajax_post_load ORDER BY post_order_no ASC");

				//number of rows
				$rowCount = mysqli_num_rows($query);

				if ($rowCount > 0) {
					while ($row = mysqli_fetch_assoc($query)) {
						$tutorial_id = 	$row['post_id'];
				?>
						<li data-post-id="<?php echo $row["post_id"]; ?>">
							<div class="post-outer">
								<div class="row">
									<div class="col-md-6">
										<h5 class="post-title"><?php echo $row["post_id"] . ') ' . ucfirst($row["post_title"]); ?></h5>
									</div>
									<div class="col-md-6 text-right">
										<span class="btn_move">
											<i class="fas fa-expand-arrows-alt"></i>
										</span>

									</div>
								</div>
								<p class="post-desc"><?php echo ucfirst($row["post_desc"]); ?></p>
								<div class="form-group">
									<label for="exampleFormControlTextarea1">Example textarea</label>
									<input class="form-control" id="exampleFormControlTextarea1" >
								</div>
							</div>
						</li>
				<?php }
				} ?>
			</ul>
		</div>
	</div>
</div>

<script>

	$(document).ready(function() {
		$("#post_list").sortable({
			placeholder: "ui-state-highlight",
			update: function(event, ui) {
				var post_order_ids = new Array();
				$('#post_list li').each(function() {
					post_order_ids.push($(this).data("post-id"));
				});
				$.ajax({
					url: "update_fn.php",
					method: "POST",
					data: {
						post_order_ids: post_order_ids
					},
					success: function(data) {
						if (data) {
							$(".alert-danger").hide();
							$(".alert-success").show();
						} else {
							$(".alert-success").hide();
							$(".alert-danger").show();
						}
					}
				});
			}
		});
	});

</script>
<!-- script end tag -->
Step 4: write some custom CSS
We will write some custom CSS for little bit better UI so that it will looks good that's it
        body {
  background-color: #e7ebee;
  font-size: 14px;
  font-family: "Open Sans", Arial, Tahoma, sans-serif;
  width: 100%;
}

.alert-success {
  color: #3c763d;
  background-color: #dff0d8;
  border-color: #d6e9c6;
  margin-top: 20px;
  box-shadow: 0 0 10px rgb(0 0 0 / 30%) !important;
}

.post-outer {
  /*background: #f5f5f5;*/
  padding: 5px 10px;
  border-bottom: solid 1px #cfcfcf;
  margin-top: 5px;
}
.post-title {
  border-left: solid 4px #304d49;
  /* background: #a7d4d2;*/
  padding: 5px;
  color: #304d49;
  margin: 0px;
  cursor: move;
}

.post-desc {
  line-height: 15px !important;
  font-size: 12px;
  padding: 10px;
  margin: 0px;
}
.panel-default {
  margin-bottom: 100px;
}
.post-data-list {
  max-height: 374px;
  overflow-y: auto;
}
.radio-inline {
  font-size: 20px;
  color: #c36928;
}
.progress,
.progress-bar {
  height: 40px;
  line-height: 40px;
  display: none;
}

#post_list li {
  box-shadow: 0 0 10px rgb(0 0 0 / 30%);
  background: #fff;
  margin-top: 30px;
  border-radius: 4px;
}
#post_list li.ui-state-highlight {
  padding: 20px;
  background-color: #eaecec;
  border: 1px dotted #ccc;
  cursor: move;
  margin-top: 12px;
}

.btn_move {
  display: inline-block;
  cursor: move;
  background: #ededed;
  border-radius: 2px;
  width: 30px;
  height: 30px;
  text-align: center;
  line-height: 30px;
}
Step 5: write the ajax function
Insert below ajax function into the index.php file above the body section you can also create a separate file but make sure your ajax url path should be correct
        $(document).ready(function(){
	$("#post_list" ).sortable({
		placeholder : "ui-state-highlight",
		update  : function(event, ui)
		{
			var post_order_ids = new Array();
			$('#post_list li').each(function(){
				post_order_ids.push($(this).data("post-id"));
			});
			$.ajax({
				url:"update_fn.php",
				method:"POST",
				data:{post_order_ids:post_order_ids},
				success:function(data)
				{
				 if(data){
				 	$(".alert-danger").hide();
				 	$(".alert-success").show();
				 }else{
				 	$(".alert-success").hide();
				 	$(".alert-danger").show();
				 }
				}
			});
		}
	});
});
Step 6: Create a PHP function page
Finally, we are going to create a PHP file in my case its name is update_fn.php
and it is mandatory to call inside the ajax function as we already called it in the above ajax function as the same name
        <?php

include('conn.php');
$post_order_ids = [2,3,1,4];
$post_order = isset($_POST["post_order_ids"]) ? $_POST["post_order_ids"] : [];

if(count($post_order)>0){
	for($order_no= 0; $order_no < count($post_order); $order_no++)
	{
	 $query = "UPDATE li_ajax_post_load SET post_order_no = '".($order_no+1)."' WHERE post_id = '".$post_order[$order_no]."'";
	 mysqli_query($con, $query);
	}
	echo true;
}else{
	echo false;
}

?>

