How to delete multiple row by selected checkboxes using PHP and ajax
Here, I will discuss deleting multiple rows from the MySQL database on the basis of the selected checkbox in PHP with oops. I have shown you how to use Ajax and JQuery to delete multiple records on the basis of checked checkboxes on one single click without page refresh. When the user wants to remove multiple table show he can check the checkbox of that table row and click on the delete button when the system will ask him do you want to delete these records if he clicks yes then it again validates that use has checked the checkbox or not if he not select any checkbox then the system will again display an alert message regarding please select at least one checkbox and if the user has selected one or multiple checkboxes then the user can remove multiple table row with background color change and fade-out effect without page refresh. For these things, I have used Ajax function call in jquery code. With the help of Ajax, it executes the delete code from the delete.php file. So, this is my tutorial on how to use Ajax to delete Multiple records from the database with the change in the background color of the table and fade-out effect without page refresh.
For completing this functionality we will use below simple steps:
- Step 01:Create Database and table
- Step 02: Create a database connection
- Step 03: Create HTML table and display the data
- Step 04: Create multiple delete functions page
- Step 05: write some basic custom CSS for the table structure
Step 01:Create Database and table
In the first step, we will create our database, and then for creating a table just run the bellow command in the SQL tab of phpMyAdmin we will also provide you the .sql file in the last of this tutorial.
        SET SQL_MODE = "NO_AUTO_VALUE_ON_ZERO";
SET AUTOCOMMIT = 0;
START TRANSACTION;
SET time_zone = "+00:00";

--
-- Table structure for table `emp_salary`
--

CREATE TABLE `emp_salary` (
  `ID` int(11) NOT NULL,
  `emp_name` varchar(200) NOT NULL,
  `salary` int(11) NOT NULL
) ENGINE=InnoDB DEFAULT CHARSET=latin1;

--
-- Dumping data for table `emp_salary`
--

INSERT INTO `emp_salary` (`ID`, `emp_name`, `salary`) VALUES
(1, 'abdul', 25000),
(2, 'rahim', 2700),
(3, 'rahul', 3500),
(4, 'sanni', 18000),
(5, 'sanni', 23000),
(6, 'rawat', 3500),
(7, 'renu\r\n', 22000);

--
-- Indexes for table `emp_salary`
--
ALTER TABLE `emp_salary`
  ADD PRIMARY KEY (`ID`);

--
-- AUTO_INCREMENT for table `emp_salary`
--
ALTER TABLE `emp_salary`
  MODIFY `ID` int(11) NOT NULL AUTO_INCREMENT, AUTO_INCREMENT=8;
COMMIT;
Step 02: Create a database connection
Now we will create a database connection using the oops concept of PHP and we will also create a function for fetching and deleting the data.
        <?php

class DBController{
	private $host = "localhost";
	private $user = "root";
	private $password = "";
	private $database = "study_post";
    private $conn;

	function __construct() {
		$this->conn = $this->connectDB();
	}

	function connectDB() {
		$conn = mysqli_connect($this->host,$this->user,$this->password,$this->database);
        mysqli_set_charset($conn,"utf8");
		return $conn;
	}
    function insertDemoData($query) {
        $result = mysqli_query($this->conn, $query);
        return $result;
    }

	 function runBaseQuery($query) {
                $result = mysqli_query($this->conn, $query);
                while($row=mysqli_fetch_assoc($result)) {
                $resultset[] = $row;
                }
                if(!empty($resultset)){
                return $resultset;
                }
    }


    public function multi_delete($option_id)
    {
    $result=mysqli_query($this->conn,"DELETE FROM emp_salary WHERE ID = '".$option_id."'");
        return $result;
    }

}


?>
Step 03: Create HTML table and display the data
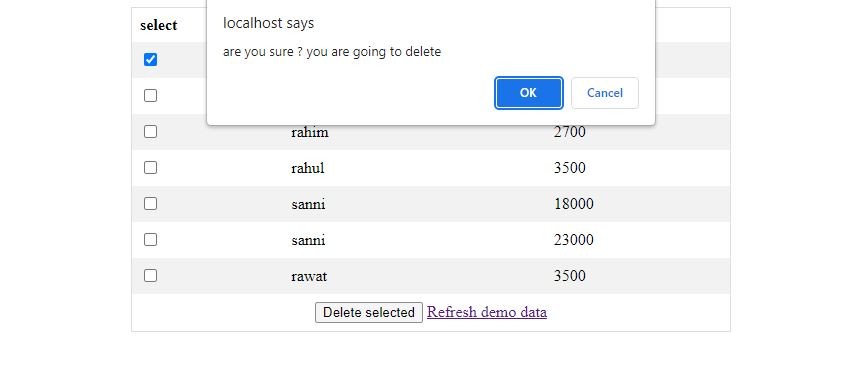
Now we will create a simple HTML table and will show the list of data in table format with a checkbox, checkbox will help us to delete multiple selected data.
        <?php
require_once("DBController.php");
$dbhandle = new DBController();


?>

<!DOCTYPE html>
<html>
<head>
	<title></title>
	<link rel="stylesheet" type="text/css" href="style.css">
</head>
<body>
<div style="overflow-x:auto; width: 600px; margin:auto;">
  <table>

    <tr>
      <th>select</th>
      <th>Emp Name</th>
      <th>Sallary</th>
    </tr>

<?php
	$query = "SELECT * FROM emp_salary";
	$result = $dbhandle->runBaseQuery($query);
	foreach ($result as $k => $v) {
		?>
     <tr id="<?php echo $result[$k]["ID"]; ?>">
      <td><input type="checkbox" name="option_id" value="<?php echo $result[$k]["ID"]; ?>" ></td>
      <td><?php echo $result[$k]['emp_name']; ?></td>
      <td><?php echo $result[$k]['salary']; ?></td>

    </tr>
		<?php
	}
?>
	<tr >
      <td colspan="3" style="text-align:center;"><button type="button" id="multi_delete_btn">Delete selected</button>
	  <a href="insertdemodata.php">Refresh demo data</a>
	</td>
    </tr>

  </table>
</div>

<!-- jQuery 3.4.1 -->
<script src="https://ajax.googleapis.com/ajax/libs/jquery/3.2.1/jquery.min.js"></script>

<script type="text/javascript">
	$(document).ready(function(){
		$("#multi_delete_btn").click(function(){
			if(confirm("are you sure ? you are going to delete")) {
				var option_id = [];
				$(':checkbox:checked').each(function(i){
					option_id[i] = $(this).val();
				});

				if(option_id.length === 0) {
					alert ("please select atleast one");
				}
				else{
					$.ajax({
						url: 'delete.php',
						method: 'POST',
						data : {option_id:option_id},
						success: function(){
							for(var i=0; i<option_id.length; i++)
						      {
						       $('tr#'+option_id[i]+'').css({'background-color': '#f60000','color':'#fff'});
						       $('tr#'+option_id[i]+'').fadeOut('slow');
						      }
						}
					})
				}
			}
		});
	});
</script>

</body>
</html>
Step 04: Create multiple delete functions page
Now we will create a delete.php page where we will run a loop on the basis of the selected checkbox id and then delete them one by one.
        <?php
require_once("DBController.php");
$dbhandle = new DBController();
if (isset($_POST['option_id'])) {
	foreach ($_POST['option_id'] as $option_id) {

		$sql=$dbhandle->multi_delete($option_id);
		//$sql = "DELETE FROM english_vocabulary WHERE ID = '".$option_id."'";
		//mysqli_query($conn, $sql);
		if($sql){
			echo "deleted";
		}else{
			echo "note deleted";
		}
	}
}

?>
Step 05: write some basic custom CSS for the table structure
Finally, we also write some basic custom CSS for better-looking table structure.
        table {
  border-collapse: collapse;
  border-spacing: 0;
  width: 100%;
  border: 1px solid #ddd;
}

th, td {
  text-align: left;
  padding: 8px;
}

tr:nth-child(even){background-color: #f2f2f2}